COST: $0-$10
EFFORT: 1 out of 5
RESULTS: 4 out of 5
Let me start by saying that this isn’t a tutorial on how to make your own weighted blanket, and there’s a good reason for that. Weighted blankets require poly pellets to give them their heaviness, and buying those pellets alone can be just as expensive as buying a ready-made weighted blanket. While I love to DIY as much as I can, I draw the line at spending more money on something that likely will be a nightmare to create — and maybe not even turn out that well.
Anyway, while I loved my weighted blanket from Amazon, I hated the itchy faux velvet cover that came with it. I would have been happy to use it without a cover, but I would have been in trouble when it got dirty. You can’t exactly throw a 25 pound blanket full of plastic pellets into your washing machine ... at least, not if you want to still own a working washing machine.
Since I love to quilt and our house is full of my handmade quilts, it made sense to make a quilt that could fit over my weighted blanket. Luckily, I already had a quilt that was 90 per cent finished and almost exactly the right size. It would just be a matter of turning this quilt into a duvet cover to hold my very heavy weighted blanket.
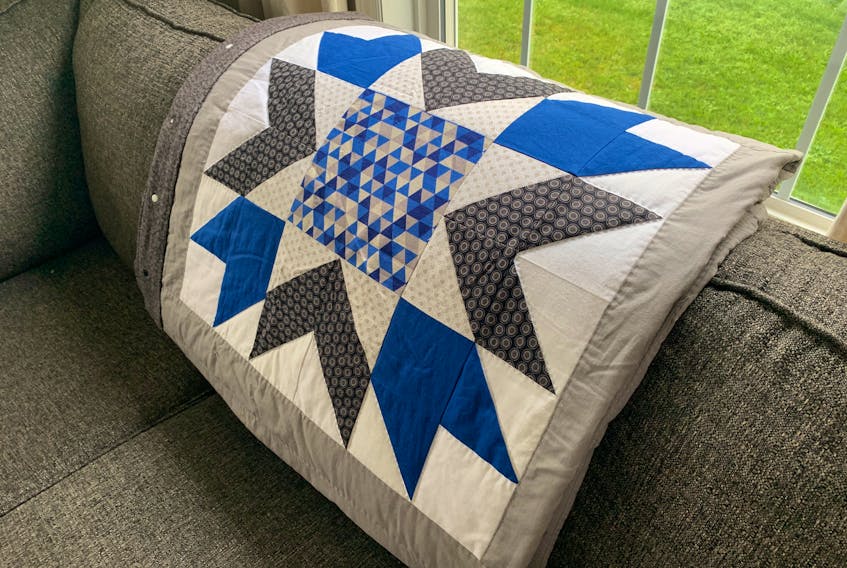
Let’s back up for a minute, though, because I want to share how I made the quilt itself. Normally I just do standard patchwork quilts (all squares) or maybe large half-square triangles (two huge triangles that form a new, larger square). But I wanted to challenge myself to do a really intricate quilt block with lots of tiny pieces coming together to form a cool pattern.
I’d scrolled through Pinterest until I found a block I loved (the Sisters and Quilters’ blog’s Blueberry Pie quilt block) and forced myself to do something that doesn’t come easily to me: math. Quilting requires a lot of math, especially for a block like this, so it’s basically an exercise in concentration and patience.
Each Blueberry Pie quilt block requires one large square and 32 small squares to go around it — with many of those squares actually cut into triangles and then pieced back together. Slowly and carefully, I cut out 198 squares from five different fabrics so I could make six Blueberry Pie blocks.

I stacked up the tiny squares by colour, and scrawled notes to myself about how many blocks needed to stay plain white and how many would be cut and mixed with black or blue blocks. Oh, how I concentrated!
Eventually, I had the little squares and half-square triangles sewn into groupings of four and fanned out to show how they’d look together to make one big block. Then it was just a matter of sewing five groupings together with one large fabric square to make one 6x6 block. Whew! One down, five more blocks to go!
Once I’d sewn together all six blocks — over the course of several weeks — I cut three-inch strips of plain grey cotton and sewed borders (sashing) around each one. Then I sewed the six bordered blocks together to make a 2x3 quilt top. I pinned the quilt top to white cotton backing (with polyester batting sandwiched in between) and started the much more relaxed process of quilting it by hand.

Now, here’s where we get to the point where the quilt was 90 per cent finished and nearly the perfect size to use as a cover for my newly-arrived weighted blanket. It was like it was meant to be!
I needed to make the quilt a tiny bit bigger (and strengthen the sides so it could hold a lot of snaps) so I added some dark grey flannel around the edges. Then I made a back for my “duvet cover” using a large piece of the grey flannel fabric with hemmed edges. The black was exactly the same length and width as the quilt top. I sewed the quilt to the back at the top and bottom, but left the sides open so I could easily take the weighted blanket in and out.
My weighted blanket came with little loops along the sides so it could be tied into its (cheap, itchy) cover, so I sewed little flannel ties into the edges of the backing that lined up with the loops sewn into the sides of her weighted blanket. (If I’d tried to put the weighted blanket in without securing it to the top, bottom and sides, it would have drooped straight to the bottom from its own weight.)

The last step was adding plastic snaps (blue, white and black) down the sides of the cover so the weighted blanket wouldn’t slip out the sides. When I need to wash the quilted cover, I just pop open the snaps, undo the ties, pull out the weighted blanket and throw the whole cover in the washer. Because the sides of the cover open up fully, it’s easy to maneuver the weighted blanket back inside, knot the ties around the loops, and do up the snaps again.
Of course, a handmade quilt isn’t a requirement to make a custom cover for a weighted blanket. This method would also work using store-bought blankets, bedspreads, comforters or even a set of fleece sheets. Just get two of something that’s slightly larger than your weighted blanket, and sandwich it inside using snaps and ties.
I’m really happy with my new quilted weighted blanket cover. It looks great tossed over the couch and feels so much nicer to snuggle up with. Between the 25 lb. blanket, the quilt (complete with batting) and the flannel backing, I’m probably pinned under 30 lbs. as I lie on the couch and watch TV. Ahhhh, gotta love that soothing feeling of being semi-crushed.
MORE MY HANDMADE HOME: